Showing posts with label How to Use Facebook. Show all posts

Friday, 21 December 2012

Facebook charging $1 fee to send messages to non-friends


San Francisco: Facebook says it is testing a service that will charge users $1 to guarantee that messages they send to people they are not connected to arrive in users' inboxes, rather than in an often-ignored folder called "other."
Launched in 2011, the "other" folder is where Facebook routes messages it deems less relevant. Not quite spam, these include messages from people you most likely don't know, based on Facebook's reading of your social connections. Many users ignore this folder.
Now, users will be able to pay $1 to route their messages to non-friends. Facebook said on Thursday that it is testing the service with a small percentage of individuals - not businesses - in the US.

"For example, if you want to send a message to someone you heard speak at an event but are not friends with, or if you want to message someone about a job opportunity, you can use this feature to reach their Inbox," Facebook said in an online post. "For the receiver, this test allows them to hear from people who have an important message to send them."
The company says charging for messages could help discourage spammers.
In October, Facebook unveiled another feature that lets users pay if they want more people to read their updates. For $7, users can promote a post to their friends, just as advertisers do.

Sunday, 16 December 2012

How to secure your Facebook account from Hackers


Many millions of people worldwide enjoy connecting with friends and family via Facebook. We get a kick out of sharing baby pictures, funny websites, and our latest adventures. Sometimes, though, we share more than we realise. For example, a cyber-creep with access to your profile might be able to answer the security questions associated with your online banking account. Scary stuff…
You know you ought to lock down your profile so that only the right people have access, but Facebook makes it unnecessarily complicated. So here's our step by step guide to protecting your Facebook privacy.

Privacy settings

To get started, log into Facebook, click the arrow to the right of Home, and choose Privacy Settings. You'll see three choices under Control Your Default Privacy: Public, Friends, and Custom. If yours is set to Public, you're sharing everything with anyone who cares to look. Immediately change it to Friends, so that by default only your friends can see your posts, photos, and so on.
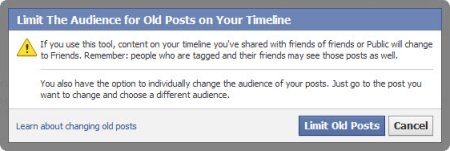
The default settings affect your posts and photos going forward. To correct older too-public posts, you can click Manage Past Post Visibility and click the Limit Old Posts button. Any posts that were visible to everyone or to friends of friends will be changed so only friends can see them.


Now edit the settings for How You Connect. Here you'll make choices about who can find you and connect with you on Facebook. If you're a public figure, or if you use your Facebook account for business, allowing just anyone to find you and send messages or friend requests may be appropriate. For privacy, though, you're better off limiting such contact to friends of friends. It wouldn't be unreasonable to limit most of these settings to people who are already on your friends list.

Next, tighten up Timelines and Tagging. There are two settings related to reviewing posts that friends tag you in; turn both of these on. Now you won't be blindsided when a friend tags you in a rowdy party photo; you can reject the tag.
Facebook can suggest tags using facial recognition, which is a bit scary. Set it so that nobody receives those suggestions. Configure the remaining three options so that only friends can post on your timeline and view posts on your timeline. You may even want to further restrict posting to specific groups like close friends or family.


Ads, apps, and websites

Got a relative who constantly bombards you with app invitations? You can put a lid on that activity by clicking the Manage Blocking link. On the resulting page you can block app and event invitations from any of your friends, or block specific apps completely. If necessary you can put annoying friends on the Restricted list. This limits them to viewing posts you've made public, without notifying them of the change. Finally, you can ban all contact with a specific user. Let's hope that doesn't become necessary.

Facebook apps can gather all kinds of information from your profile. If you really value your privacy, you'll want to limit your use of apps to a bare minimum. Click the Edit Settings link next to Ads, Apps, and Websites, then click the Edit Settings button next to the list of apps you use. For each app, click Edit and review the permissions that app has. Consider removing any that you don't actively need and use.
You can be the most careful person in the world, but your friends can still expose tons of private information. Below the list of apps there's a section about how people bring your information to apps they use. Click the Edit Settings button to see just how much of your private information they can share. Shocked? Uncheck all the boxes, or all that you don't want your friends sharing for you.


Instant personalisation lets participating websites personalise your visit based on information in your Facebook profile. If that sounds creepy to you, make sure this feature is turned off.
Here's another creepy one. In the future, Facebook may give third party advertisers the option to use your name and picture in their ads, though they don't do so yet. If you want to prevent this, click the Edit Settings link in the Ads section, and click the Edit third party ad settings link on the resulting page. From the drop-down list, select "No one" and click Save Changes.


Back on the Facebook Ads page, click the Edit social ads setting link. Read the description carefully and decide whether you want to allow this feature. If you don't want your social actions associated with ads that your friends see, set this one to "No one" too.
Whew! As you can see, there are quite a number of settings involved in locking down your Facebook profile, but it's well worth your while to go through them all. Now you can share your life with your friends, and only your friends.

How To Get Free Facebook Credits and also Make Money Online


I’m going to introduce a site for you to get free Facebook Credits. Before teaching you how to get free Facebook Credits in this way, I want to first tell you that you could only register ONCE in this site. Do NOT ever want to cheat in this site, or you’ll get banned! I suggest you to read the terms of the site carefully in order to familiar with the site.


1. Access The Site Here. You should see a SIGN UP box near the top/middle of the page. Enter your email address (*remember to use a VALID email) and click sign up. Fill in all other information to complete the process.

2. Confirm Your Email Address. Go to your email inbox which you’ve provided in the sign up process. You should see an email sent from the site (if not, just wait a while). Click the confirmation link in the email. After that, you should see 250 points bonus in your account! (if you do not confirm your email, you won’t receive the points!)


3. Go To The Site Section: Earn Points  Free Offers. (the navigation bar is at the top of the site) After clicking free offers, a list of offers will be shown up and each offer would have several details including: the amount of points you will earned after completion, approved times, approval rate, approval time and offer description.

You can choose all the offers which you’re interested in to complete, but I suggest you to choose offers which has the HIGHEST AMOUNT OF POINTS with HIGH or VERY HIGH approval rate and FAST approval time to complete first (just like the one I display here). You may need to take some time to complete these offers but it shouldn’t take long. After completing the offer, you should receive your points very quickly. You can continue to complete the next offer and earn more points!

4. Redeem Free Facebook Credits or Other Prizes. Go to the site section: Spend Points → Redeem Your Points. After you’ve earned enough points for free Facebook Credits or other prizes, simply go to the redeem section to redeem your prize. For Facebook Credits, it’s under the category ‘Gift Cards’. There are 3 different amounts of Facebook Credits you can redeem – $15, $25 or $50. After you’ve claimed your redemption, the free Facebook Credits should be emailed to you within minutes!

5. Visit the site frequently to earn more free rewards. Take some time to look around the site thoroughly. You’ll find there’re many rewards you could earn and there’re many simple and interesting tasks for you to complete! You could also chat and make friends with the members (or ask questions if needed) by typing in the shoutbox in the right hand side of the site or going to the Forum of the site.

Incoming Traffic

  • Free facebook Credits
  • How to get Free Facebok Credits
  • Facebook Credits Exchange with points
  • How to Earn Free Facebook Credits
  • Free Facebook Credit Generator
  • Fee facebook Credits 2012
  • latest Hack,Cheat,codes about free facebook Credits
  • 2000 free facebook Credit Scam
  • How to Earn money online 
  • facebook Credits Hack 
  • facebook Credits Generator
  • How to increase facebook credits
  • How to use facebook credits
  • transfer facebook credits
  • What are facebook credits
  • free facebook credits generator
  • free facebook credits cheat
  • free facebook credits hack
  • free facebook credits codes
  • how to get free facebook credits for wild ones
  • how to get free facebook credits
  • free facebook credits no survey

Saturday, 14 July 2012

7 Ways to Get More Facebook Likes

If you have your own Facebook fan page or business page, your number one concern is probably how to get more likes. By spending a short time on your efforts each day, you can see positive results and increase the number of

Monday, 25 June 2012

How to Unpublish Your Facebook Fan Page

Are you managing a Facebook fan page? Yeah your Facebook fans gather around your Facebook page and see what's new happening over there. Sometimes you may wanna make few changes to your page, such as editing basic information, changing page name or adding applications to your page. In
such scenario, you may need Facebook users out from your Facebook page or just wanna make sure it's inaccessible until you done with a process on it. Hmm.... If you need you can post a message that your page is going through a maintenance in such period of time. But still they can access your page. Wouldn't it better if you can make your Facebook page inaccessible from public?

Why You Need to Make Your Fan Page Inaccessible?


Changing basic information and settings doesn't take much time. But in some scenarios if you are adding applications to your fan page, you may have to spend lot of time with the application to customize it before enable accessing for public. Eventhough you are busy with customization, meantime users land on your page may try to access them even you are not done with them. Also sometimes you may wanna edit content or remove application from your page without further commenting or accessing. Or if you have got a fresh page that should post from scratch, you may wanna synchronize posts to your wall before showing it to public. Further you may have got similar situations.

Let's Unpublish...


Are you aware of seeing your fan page before commit all changes? Then you might have to notify your users to not to access your page in such time period. isn't it? Nope. You can do it easily without passing any messages around. Facebook allows you to unpublish your page from users until you done with changes to your page. By unpublishing, your page will be invisible for external users and users who liked your page too. At that state, only administrators will be able to see their fan page with the indication of your page visibility. So if you are hoping to do any major change on your fan page, you will find this option really awesome and it will prevent you from seeing ongoing changes by other users.

Steps:

1. Sign in to your Facebook account.

2. Navigate to your Facebook page.

3. Find Admin Panel on top of page.

4. Click on Edit Page on drop down menu.

5. Now select Manage Permissions.

6. Navigate to Page Visibility setting and tick on Unpublish page option.

7. Now click Save Changes button.

Note: Once your page switched to unpublish state, you will see following notification on top of your cover.


More Information:


* To publish your page again, click on publish this page link on the notification bar or follow same steps above and untick Unpublish page option.

Saturday, 23 June 2012

How to Download Your Information on Facebook

Each day, how many times you communicate with friends, share content, upload photos or add information on your Facebook profile? Obviously you may never forget to check your profile frequently. Facebook is a great platform with unique features to meet your friends, families and
followers. However you may have shared a lot of content on your profile up to now. You may have shared photos and videos with your families. Or chat with friends, send messages, write on walls and vice versa. May be your Facebook profile holds information or data which you couldn't find elsewhere, even in your mobile or computer. So what if you wanna download all your information and data on your Facebook profile?


Facebook provide you a service which let you have a copy of information you have shared on Facebook. This archive includes your profile information, your list of friends, notes, events, events, messages and your wall/timeline including comments, photos, posts and other content posted by your friends. However Facebook doesn't allow you to select and download them individually. Once you request for information, Facebook will generate copy of your information and allows you to download your archive. As it has your sensitive information, Facebook will need to confirm your identity when you downloading your archive. Therefore eventhough you left your browser logged into Facebook account, no one will be able to download your information.
Steps:

1. Sign in to your Facebook account.

2. Navigate to Account Settings page.

3. Now find the line Download a copy of your Facebook data at bottom and click on Download a copy link.

4. Click Start My Archive button.

5. Now again click Start My Archive button on the dialog box.

6. Click Okay button once after it displays You will receive an email when your archive is ready for download message.


Note: You will receive an email to your associated email account once Facebook initiated the process of generating information. Unless you receive an email, you better try above steps again to see if it started already.

7. Now you have to wait until Facebook generates your personal archive.

Note: It may take quite time to generate your archive.

8. Once your archive ready to download, you will asked to re-enter your Facebook password. Enter your password and click Continue.

Note: If you are accessing your Facebook account from a public computer, you will prompt to solve friend photo captcha or an SMS captcha.
9. Now click Download Archive button and it will download your content in a Zip (.zip) file.

10. Extract your downloaded Zip file with Facebook information, and double click index.html to view your information.

Enjoy :-)

How to Create a Facebook Application for Your Site

Nowadays Facebook is a renowned social media platform with unique set of features evolving on the Web. Facebook has given the opportunity to use their native functionality to improve user experience on websites and blogs. As it has more simplified, convenient and personalized
social experience, more and more users started to integrate Facebook social platform in to their websites. Basically Facebook offers social plugins to use with their sites to embed social features on their sites. But if wish to integrate Facebook platform more deeper into your site, then you need to create a Facebook application for your site. Oops... but do you know how to create an application for your site?

You need to register your site with Facebook to grab an application for your site. However you can implement Facebook social plugins on your site easily without registering your site. But if you wish to integrate Facebook platform more deeper in to your site, you should register your site with Facebook to get application ID aka API key. For example, if you wish to simplify and enhance user registration and sign in by using Facebook login button, then you have to get a Facebook application for your site to use with Facebook JavaScript SDK to access rich set of client-side features for authentication and authorization purposes. In addition, to enhance the usage of XFBML implementations of social plugins, to moderate all comments made via Facebook comment plugin in your site, you need to register your site with Facebook or create a Facebook application for your site.


Steps:

1. Navigate to Facebook Applications page.

2. Click on Create New App button.

3. Enter the name you wish to have for your application in App Display Name field and enter your preferred namespace for your application in App Namespace field.

Note: Namespace must be at least 7 characters and it will use for Open Graph and Canvas page if you gonna make use of them.

4. Now check I agree to the Facebook Platform Policies option.

5. Click Continue button.

6. Now you will prompt to enter captcha text. Enter captcha text in the box and click Submit.

7. Now you will navigate to application summary page and move on to Basic Info Heading.

8. Enter your domain or subdomain in App Domain field.

Note: If you are hosted your website or blog on a free domain, then add your subdomain here. For example, if your blog on Blogger platform, it should be specified as blogspot.com.

9. If you prefer you can select category of your application via Category drop down box.

10. Now scroll down and find the heading Select how your app integrates with Facebook.

11. There click on the Website section.

12. Now enter your site URL in the Site URL field.


13. Now click on Save Changes button.


More Information:

You can find your Facebook Application ID aka API key on the top of Facebook Application page correspond to your application. Further you can explore other settings for your application from the left pane.

Friday, 22 June 2012

Publish Your Posts on Facebook using RSS Graffiti

As if you like to take advantage of the social media to gain more traffic and reach more interested users for your content, you might have already created a Facebook fan page for those needs to be satisfied via Facebook. Else you can post them on your own wall to find
them useful to your friends. Yeah, Facebook has largenumber of users worldwide and it became more and more popular everyday. That's why you are trying to take advantage of Facebook. You can post a link of your post on your profile or fan page to notify Facebook users when you have fresh content on your site. But wouldn't it be better to automate that process to post automatically on Facebook whenever you have fresh content?

RSS Graffiti is a type of a useful application to fetch your feed to your Facebook profile or fan page. As you may know, feeds are automatically updated when it can find fresh content on your site. So RSS Graffiti will publish whenever your feeds get updated. So rather than sparing extra time to post your content on your Facebook profile or page wall manually, you can make use of RSS Graffiti to publish your latest content automatically and notify your Facebook friends and fans who are waiting for your latest content in no time. Now let me help you to configure RSS Graffiti for your blog and to publish your future updates on your Facebookprofile or page easily without any extra effort.

Steps:

1. Go to RSS Graffiti Facebook Application Page.

2. Now click Go to App button.

3. Click Allow button to give permissions to access your Facebook pages to publish on behalf of you.

4. Now click Add New Publishing Plan link.

5. Name your publishing plan and click Create Publishing Plan button..

6. Now on left side, click Add New button.

7. Enter your blog or site feed URL on in the given textbox on Add a New Source box.
Note: If you are a Blogger user and don't know your feed address, read Know Your Feed URLs in Blogger.

8. Click Add Source button next to Sources label.

9. Now you will direct to settings page related to your added feed. Set scheduling frequency, number of posts you need to feed per update and order of updates.

Note: You can switch to Advanced view and access advanced settings related to your feed.

10. Once you done with settings, click Save button.

11. Now click Add New button next to Target label.

12. First, select your target using Choose Target drop down box. It can be either your Facebook profile, page or group.

13. Then select how it should post on behalf of in Publish on Behalf of drop down box.

14. Now you need to select how your posts should be posted on Facebook. Select preferred post style - Standard, Compact or Status Updates.

Note: You can see a preview below, when you select each option.

15. Click Save Changes button.

16. Now make sure you made posting active by switching button to ON phase.

Add Facebook Like Button for Blogger Posts

While you blogging with your own blog, you may interest in enabling your viewers to share your blog content through social media to their profiles or friends. It enables your blogger friends to share information easily and help to increase your blogger traffic through sharing content over social media. Such a way is Facebook Like button. It interpret you, how many Facebook users interest in particular post in your blog and sharing it over their Facebook profile. Now Facebook Like button added a Send button along with it. So while your friends sharing your blog contents over their profile, they may able to send your posts to their Facebook friends too.

It doesn't matter you are Facebook member or not. You can implement Facebook Like button to let other Facebook members to vote on your blog posts. There are two implementations of Like button, XFBML and Iframe. But here we gonna use XFBML version and its also

available in HTML5 markup which is more versatile and supports Send button. But the only disadvantage with Facebook like button is, if you migrate to another domain after implementing like button, the likes will be vanished and you can't restore them back. If you wish to migrate to another domain, just don't depend on your Facebook likes. It's just a motivator and believe in the content you provide on your blog. So you won't need to worry about likes. The most important thing is content quality and you can gain likes back for them anytime.

Before You Go:

* Unless if you have implemented Facebook JavaScript SDK in your blog, you have to add it before you proceed with steps.

* If you are a Facebook member, you can see insights for your posts being liked and shared on Facebook and you are allowed to customize image and snippet posted on user's wall whenever they like your posts through Facebook Like social plugin. If you would like to grab those features, implement Facebook Open Graph Protocol on your blog.

Steps:

1. Go to Blogger Dashboard.

2. Click on your Blog Title.

3. Navigate to Template tab.

4. Click on Edit HTML button.

5. Click Proceed button to view Template Editor.

6. Tick on, Expand Widget Templates.

7. Search (Ctrl + F) for <data:post.body/> in template and add one of following code according to your preferred implementation code and layout style just after that. You can use XFBML or HTML5 markups.

Tuesday, 19 June 2012

Easy and Powerful Techniques for Online Business

Bryan Winters a professional internet marketer and expert in online business start ups says that the most vital way to build ones online business is by first and foremost making sure they have built a online base of customers that he refers to as “Responsive Lists”
Let me put it this way. If you own a shop and have about 10 customers that always come in and you always ask them how they are, find out how you can help, give an honest opinion about the merchandise and products that you are selling, send them email or text messages when new stock or special offers arise, and so on and so forth.
Will not those 10 customers be inclined to keep buying from you? They become basically your friends and begin to open up to you more and even give you feedback on your services and products without you even asking because it reaches a point and time where they feel that the shop is almost like theirs.
This is what Bryan Winters means when he says “Responsive List/customer base”, people that respond to you in a positive way. Learning his Powerful and Easy to implement techniques have helped create a substantial amount of wealth for many.

Basic Online Business Techniques

When someone starts an online business, and many do, they tend to think that they know what they are doing. In other words, they don’t have a clue. Everyone keep telling them that they need a nice looking website, throw some affiliate programs on it, advertise at free classifieds pages, and watch the money roll in. Easy money, right? That’s what they think.